
To take excellent photographs, you don't need to be a professional. To increase the quality of your pictures, follow these basic guidelines.
Digital photography has made photography more accessible to everyone. People are shooting more images than ever before and sharing them with friends and family in unprecedented numbers. If your photos aren't as good as those you see online, it's tempting to blame the camera (or your smartphone), but by following a few principles, you can enhance the quality of your photos without having to spend a lot of money on a new camera. Keep these ten simple pointers in mind the next time you go out to photograph the world around you. Also, please share any strategies you've learned that have helped you capture better photos in the comments area.
1. Master the fundamentals of composition
The composition of a photograph—the placement of various objects in a frame—is at its core. The Rule of Thirds is the simplest rule to learn and remember. Essentially, you'll want to divide your frame into nine fairly equal squares. Try to place your photo's topic along these lines and intersections, and visualize the main image as divided into nine compartments. This creates a more dramatic and aesthetically appealing photo than if your subject is in the middle of the frame. When photographing, many cameras and smartphones feature a rule of thirds grid overlay that you may use.

2. Make exposure compensation adjustments
As long as you aren't shooting in full manual mode, your digital camera is making judgments about how bright or dark a photo is exposed. In general, a camera examines a picture and attempts to calculate the proper exposure based on the optimal illumination of a gray card, which is why special scene settings for snow exist—without them, the camera would attempt to turn white snow gray.
You may either explore through the hundreds of scene settings available in current point-and-shoot cameras or just dial in a bit of exposure correction if a shot is overly bright or dark. Many cameras contain a +/- sign on a physical button or dial for this. Lower the scale-up above 0 if your photo is too dark; if it's too bright, move it down a little.

3. Select the Appropriate Shooting Mode
Your camera's shooting modes are likely to be numerous, ranging from entirely automatic to extremely precise scene modes. If you're shooting fast action, switch to Shutter Priority ("S" or "Tv") mode and increase the shutter speed—1/125 second or faster will help to freeze action, and for really fast subjects (like the hummingbird below), use the shortest shutter speed possible to freeze motion or a longer one to add motion blur to the flapping wings.
In low light, utilize Aperture Priority ("A" or "Av") mode to ensure that as much light as possible enters the lens, or close the lens's iris to improve depth of field, keeping everything in perfect focus from the foreground to the horizon if you're shooting landscapes on a tripod. If you shoot with a DSLR, you're more likely to utilize the A or S modes, although point-and-shoot cameras generally have more particular settings for sports, low-light shooting, or landscape photography.

4. Consider Lighting
When taking images, pay attention to how much light you have and where it comes from. If you're shooting outside, avoid photographing people with the sun behind them unless you want to create a portrait with dramatic flare (make sure to dial in positive EV adjustment if you do). If you're taking a picture in front of a monument or landmark and don't want it to be overexposed, use fills flash to make your backlit subject as bright as the backdrop. On a sunny day, you might have to manually activate the flash since the camera could believe it's unneeded.
5. Make judicious use of your flash.
A flash fired too near to a subject has ruined many a photograph. If your friends and family seem like Casper the Friendly Ghost when you picture them, you're probably photographing them too close together. If you need to use the flash, step back and zoom in a little to achieve the right framing. Check to see whether the flash correction is available if things are still too bright—or too dark. Many cameras let you change the flash's strength, which can help your flash-assisted photographs look more balanced. It's possible to fill in shadows with only a tiny bit of light, resulting in a more natural-looking shot.

6. Shift your viewpoint
The majority of snapshooters and beginners will stand on two legs and take pictures at eye level. While this is acceptable for many photographs, it is not always the best option. You may more easily film from a low or high angle to gain a fresh perspective on your subject if you have a camera with a tilting screen.
If your camera doesn't have a tilting LCD, consider going down low to the ground to obtain the greatest images of dogs and toddlers—the camera should be at their eye level for a striking image. With a digital camera, you don't have to pay for every image, so experiment with different perspectives and camera settings until you find one that catches a moment and stands out from the crowd.

7. Keep an eye on your white balance
Based on the sort of light you're shooting in, your camera will attempt to establish white balance automatically. Distinct forms of light cast different colors: sunlight is highly blue, tungsten lighting is yellow, and fluorescent lighting is somewhat green. In many circumstances, the camera will recognize the sort of lighting you're in and alter the color in your images to make them appear more realistic.
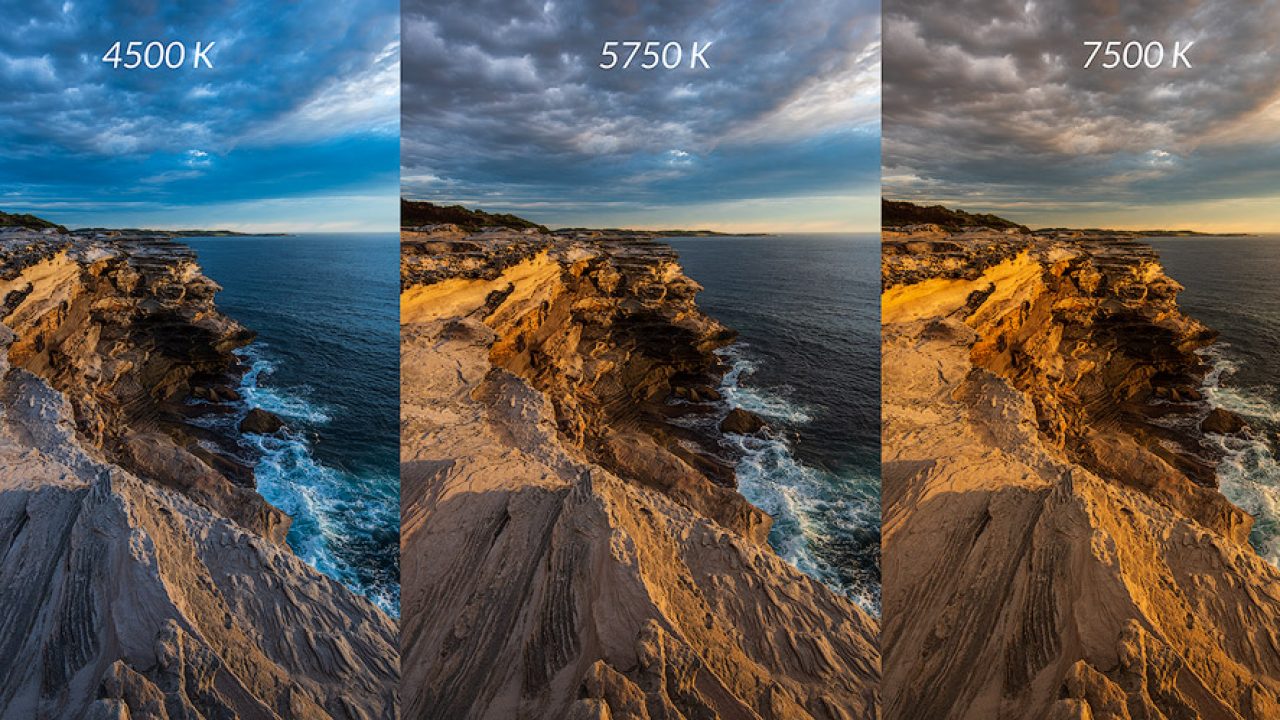
When White Balance is incorrect, though, you can get results like the one above—the picture on the left is balanced appropriately, but the one on the right is completely off. You may manually change the white balance if you're shooting in different lighting conditions or if the camera is having trouble figuring things out. To change the White Balance on most point-and-shoot cameras, you'll have to go into the shooting menu, although many SLRs include a dedicated White Balance button, commonly branded "WB." You can fix color in the accompanying Mac or Windows photo editing programs later, but getting the white balance perfect the first time will result in better-looking photographs.
8. Use a Tripod or Monopod
Taking a little more time might sometimes be the greatest way to get your photo just right. A tripod, combined with your camera's self-timer, will allow you to set up framing and will help you get that photo of you and the kids in front of Mount Rushmore. If you use a point-and-shoot camera, you can get away with an inexpensive tripod, but investing a little more on a brand like Manfrotto or MeFoto can save you a lot of hassle compared to bargain brands you'll find at the local five and dime. Owners of mirrorless systems and SLR cameras should choose a tripod carefully, since a set of legs and a head that are solid enough to hold the camera are essential.

A monopod—which is exactly what it sounds like, a tripod with two of its legs missing—will help you steady your shots if you're more of a run-and-gun photographer. A monopod is supplemented by your two legs to add stability to your camera—without the sometimes-complicated setup and breakdown required with a good tripod. Great for use at zoos and sporting events, a monopod is supplemented by your two legs to add stability to your camera—without the sometimes-complicated setup and breakdown required with a good tripod.
9. Pick your battles.
When shooting digitally, it's simple to take hundreds of photographs in a few hours. But don't just delete everything from your memory card and upload anything to Facebook. Spend some time searching through your images to get rid of any duplicates and remove any photos that are out of focus or badly arranged. It's preferable to upload a few dozen amazing images all by themselves rather than a few dozen good photos buried among hundreds of bad ones.
10. Remember to Post-Process
To organize and edit your images, consider utilizing the software. Basic organization and editing features are available in Apple Photos and Microsoft Photos. Check out VSCO or Snapseed if you like to edit your photos on your phone. A photo's quality may be substantially improved by performing some simple modifications. Cropping and rotating a photo such that the horizon lines are straight might help with composition. It's a tall objective to get immaculate images in camera; there's no harm in a little tweaking.